Add External Leads to OptiPub via Zapier
Use Zapier to add leads, create subscriptions, and attach customer meta
This guide requires a paid Zapier account and an OptiPub Personal API Key. If you aren't sure if you have these requirements or if you get stuck at any point during this guide, then review our guide to Zapier Integrations.
Make sure to have your Personal API Key available to provide to Zapier.
This guide explains how to add leads to OptiPub via Zapier which will:
- create subscriptions to a publication.
- Attach first name and last name values to the subscriber.
Collect Data from OptiPub
publication_idandBut for this guide we will also attach a first and last name to the subscription.
View all available subscription parameters in our API Reference for Create Subscription .
- Collect the
Publication IDfor the Publication where you will create Subscriptions.- Navigate to
OptiPub > Administration > Publications. - From the Publications Table, retrieve the ID of the Publication.
- Navigate to
If the Publication does not exist then Create a Publication.
- Collect your
Subscriber Variable NamesforFirst NameandLast Name- Navigate to
OptiPub > Messaging > Variables. - From the Variable Table, retrieve the value in the Name column (NOT the Macro name).
- If you have a lot of variables or can't find the correct variable names, try filtering the Name column by typing 'first' or 'last' in the input field and pressing [Enter].
- Navigate to
All Variables are created by you, the client. OptiPub does not create any default variables. If you cannot find the correct variables then Create new Variables.
Update your POST Request Script
For your initial test, use an email address that you have access to, or an alias for it if you are already subscribe to your Publication.
This will guide will actually create a subscription to your publication.
Using an email address you can access allows you to review the full outcome of your testing. And doesn't subscribe an unknown existing or non-existing email address.
Make sure your script's POST request parameters will match up with the parameters needed in OptiPub.
If your script is set up to loop through all your names, let's extract just your POST request so you can test a single example before you start blasting Zapier with all you've got.
Here's a simple example of a POST request with a first and last name that should work after replacing the endpoint variable with a valid Zapier webhook URL.
endpoint="https://placeholder.zapier.com/hook/"

curl -X POST "$endpoint" \
-H "Content-Type: application/json" \
-d '{
    "email": "[email protected]",
    "firstname": "John",
    "lastname": "Doe"
}'
Setting up the Zap
Log into Zapier and click any of the [Create] buttons you see and choose Zaps from the dropdown options. This will open Zapier's Copilot AI Powered Zap Builder.
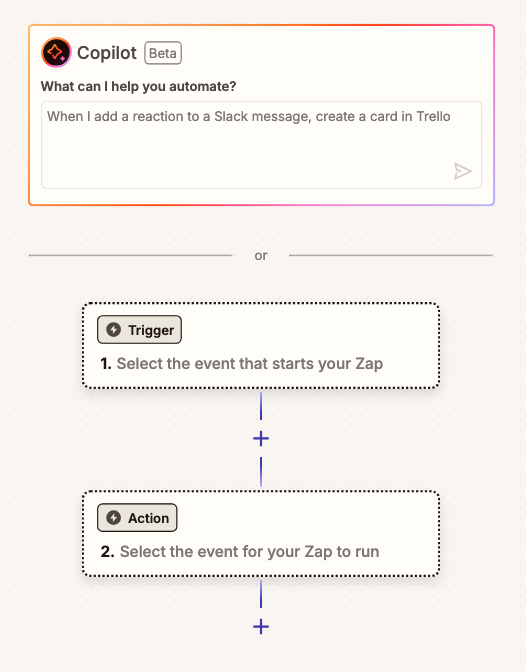
Zapiers Copilot Zap Builder
Configure Zapier's Zap Builder
Step 1. Zapier Copilot: Ready for Liftoff
Zapier's Copilot is pretty accurate, copy/paste and send this script as Copilots automation message.
Create a subscription in OptiPub when receiving a POST request
Create a subscription in OptiPub when receiving a POST requestCopilot will process the script and return the appropriate Trigger and Action steps we need.
Click [Add all steps to Zap]
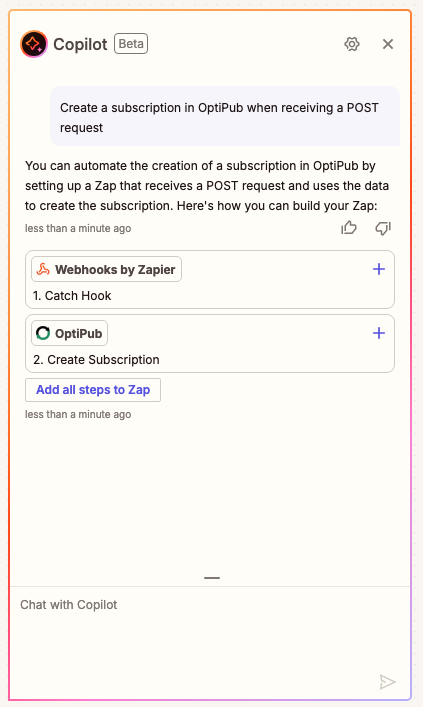
Zapier will add these steps to the Flow Pane
You should now see the zap steps from the screenshot have been added to the Zap Builder Pane.
Step 2. Trigger: Send a test POST to the Zapier Webhook
You must test the webhook trigger before the 'Configure' step of the OptiPub action.
This step provides the fields you are mapping to in the OptiPub 'Configure' step.
Click on Step 1. the 'Webhooks by Zapier' Catch Hook. You'll find 'Your webhook URL' has a zapier webhook endpoint URL provided.
Update your single firing POST script to hit this endpoint. Then execute your request.
The response returned to your CLI will look similar to this:
{"attempt":"01933054-d93c-6357-1ad3-3dd2c288da2c","id":"01933054-d93c-6357-1ad3-3dd2c288da2c","request_id":"01933054-d93c-6357-1ad3-3dd2c288da2c","status":"success"}
A success response will include "status":"success".
Click the button [Test trigger].
Click on one of the requests that appear and review it's content. Then click the button [Continue with selected record]

Review the content Zapier received from your POST
Step 3. Action: Make Sure AI got the Setup Right
Click on Step 2. 'OptiPub' Create Subscription. The Setup step should correctly have:
- App - 'OptiPub'
- Action Event - 'Create Subscription'
- Account - 'OptiPub' or something similar - Only if you've connected Zapier to your OptiPub account before.
If Account is blank or you need to Connect Zapier to OptiPub move on to Step 3.
If Account is displaying your OptiPub account skip Step 3. and click the [Continue] button.
Step 3. Action: Connect Zapier to your OptiPub account
Click inside the Account box and if needed click on the button to [Connect a new account].
A pop up will appear to connect to OptiPub using your App Domain (do not includehttps://) and API Key.
- App Domain - Enter your
OptiPub Endpoint URL(ex.client.app.optipub.com) - API Key - Paste in your
OptiPub Personal API Key(read the very top of this guide if you don't have your API Key ready)
Click [Continue] to move on the the Configure step.
Step 4. Action: Map Request Data to OptiPub Data
Make sure you have the
publication_idandvariable namesyou collected in the beginning 'Collect Data from OptiPub' step.
In the OptiPub Action > Configure step you will map your request data to the fields required for OptiPub to Create a Subscription.
- Email Address - Click on the '+' button and select the 'Email' data field from your request.
- Publication ID - Type in the
publication_idof your Publication. - Variables - First Name
- Type in the
variable namefor your first name OptiPub Variable in the left input field. - Click the '+' button in the right input field and choose the first name data field from your request.
- Type in the
Click on the [+ Add value set] button so you have 2 value sets under Variables
- Variables - Last Name
- Type in the
variable namefor your last name OptiPub Variable in the left input field. - Click the '+' button in the right input field and choose the last name data field from your request.
- Type in the
Click [Continue]
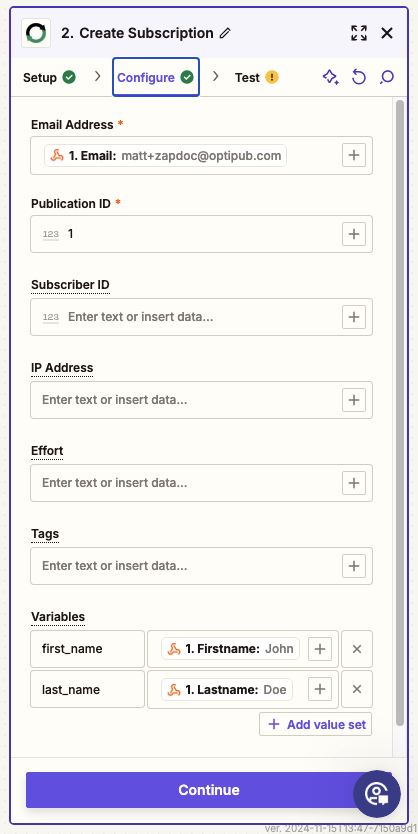
Add your request data fields to corresponding OptiPub data fields
Step 5. Action: Submit Request to OptiPub and Publish Zap
The 'Test' step will create a subscription to your publication. For testing, make sure you are subscribing an email address that you can access.
'Data in' displays the data you will submit to OptiPub. Review that a final time.
'Data out' will then display the response data from OptiPub once the submission has been processed.
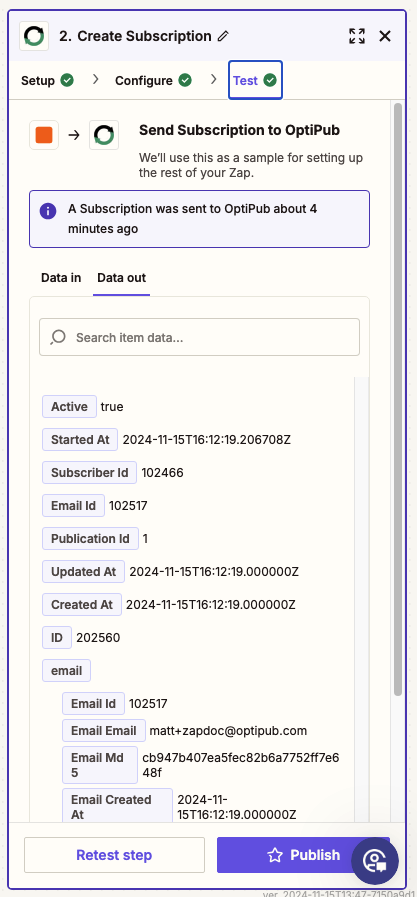
Submit Test and see the response from OptiPub
Now let's first confirm OptiPub created the subscription correctly before you publish the Zap.
Step 6. Confirm Subscription in OptiPub
OptiPub > Messaging > Subscriptions
Open a new tab and log into OptiPub and navigate to Subscriptions.
Filter the 'Email' column by typing in the email address of your test subscription into it's input field and press [Enter].
(Most likely you won't have to do this, because you will see your new subscription close to the beginning of the Subscriptions Table)
Click [action menu] > View, the 3 vertical dots button, next to your new subscription, to open your subscriber page.
Confirm each tab as correct data for your subscriber:
-
Subscriptions - You have an 'Active' Subscription for the Publication you subscribe to in the test.
-
Variables - You have first name and last name variables with the correct values you used in the test (previous values will be overwritten).
-
(Optional) Message History and Segments - If you have funnels to send a welcome letter or add new emails to segments you should also review those tabs.
If everything looks good, then you can Publish your Zap.
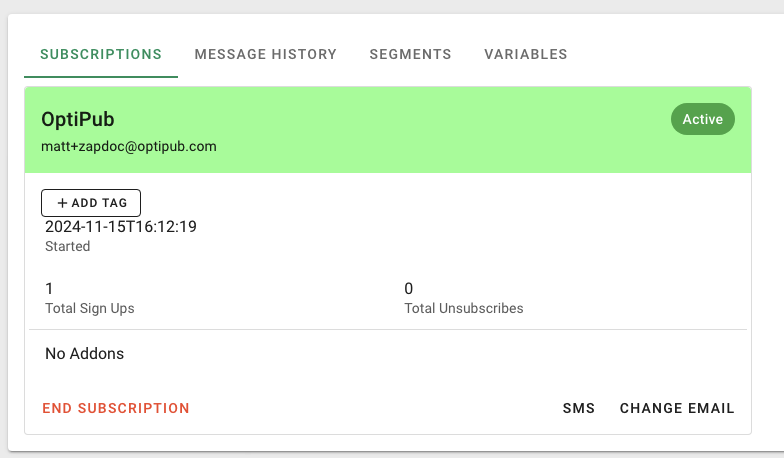
Check the 'Subscriptions' tab for an Active Subscription
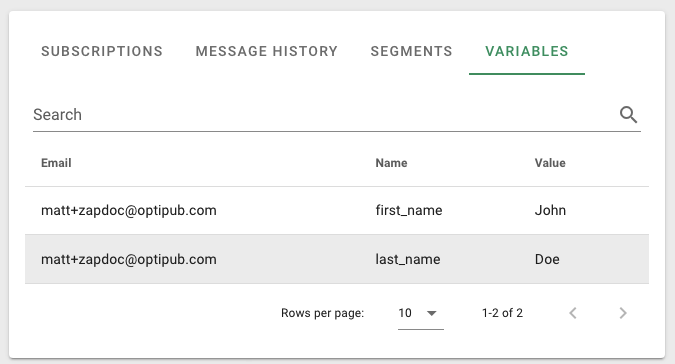
Check the 'Variables' tab for correct variables
Step 7. Complete: Publish and Enable your Zap in Zapier
If you still have your Zap open in the Builder, click the button [Publish] in the final step of the OptiPub Action, or the top right of the screen.
Navigate to your Zapier Zaps page, and in the Zaps Table, check for a recent zap named 'Create OptiPub subscription from Webhooks', or something similar. Or if you edited the name when creating the Zap, look for that name.
From the Zaps page y
If you haven't already done this, open the Zap from the Zap Table and click the button [Publish] from the builder page.
Go back to the Zapier Zaps page, and in the Zaps Table, toggle your Zap's Status right to enable your new Zap.
Success! You've created a working Zapier Zap that can listen for a POST request and Create a Subscription in OptiPub.
(Optional) You can execute another test POST request and look for "status":"success" included in the response to ensure the zap is still listening.
Updated 2 months ago
