Campaigns
A Campaign is the hub of marketing activity in OptiPub. Campaigns identify the promotion and source, organize the marketing resources used in the initiative, and track subscription acquisition and revenue statistics. Each campaign link creates an Effort that tracks individual engagement metrics.
Key Features
- Campaign Builder — Visually design your campaign flow with primary offers and upsell/decline chains using a drag-and-drop interface.
- Campaign Links & Efforts — Generate trackable links that record visitor and conversion statistics per effort.
- Partner Assignment — Assign partners to campaigns to track lead source performance.
- Tags — Group campaigns by promotion, event, or period using Tags to aggregate statistics.
- Resource Integration — Associate campaigns with ads, messages, auto responders, and landing pages for a cohesive subscriber experience.
Create a Campaign
Before you start creating most types of campaigns, you should already have created an Order Page and/or a Promo, and you will need a Partner.
Deactivating a campaign does not deactivate previously generated links — it only hides the campaign from selection throughout the app. Attempting to generate new links on an inactive campaign will cause an error.
Step 1. Create the campaign.
- Navigate to Marketing > Campaigns and click the green Create button.
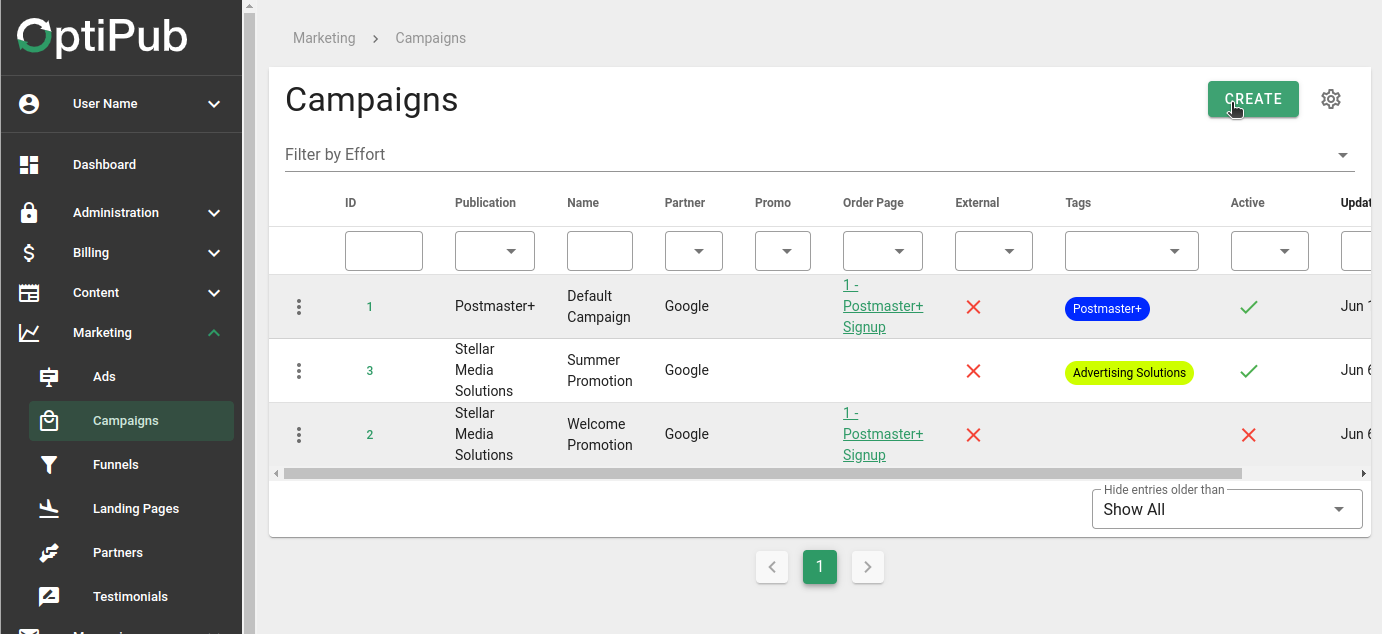
The Create campaign button.
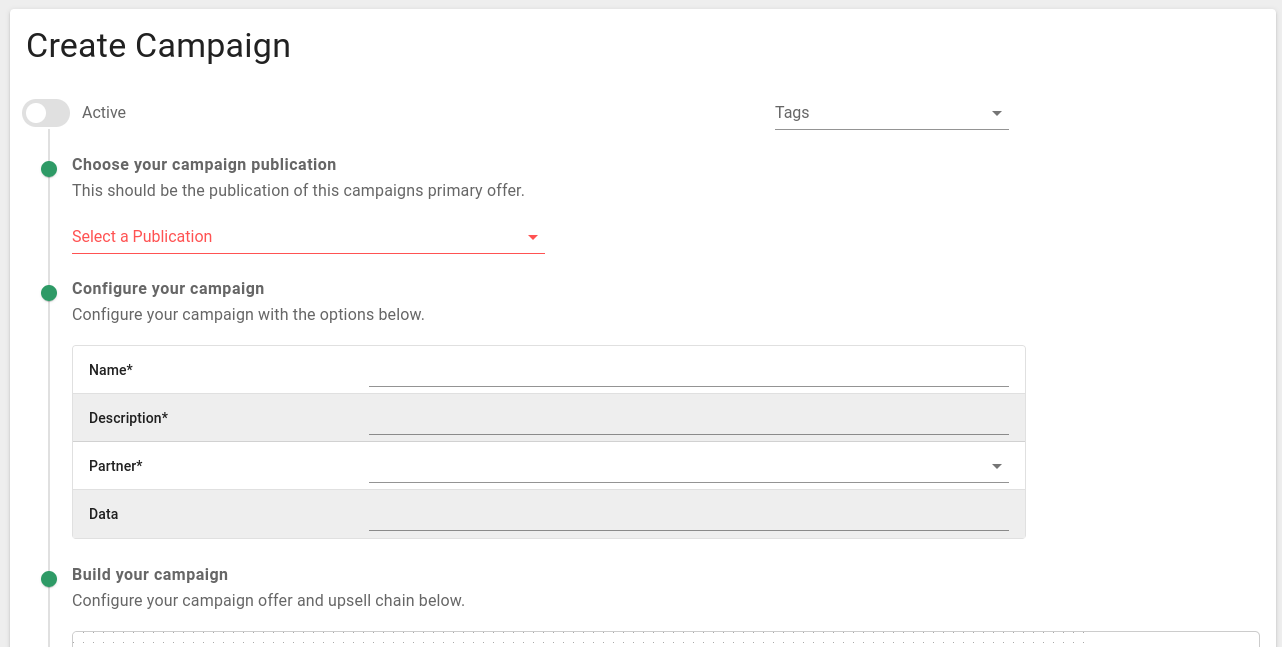
Campaign options
- Toggle Active on or off. Inactive campaigns are hidden from selection in most OptiPub tools.
- (Optional) Add Tags to group this campaign with related promotions.
- Select the Publication. This must match the publication of the primary offer.
- Choose the campaign offer type:
| Offer type | Behavior |
|---|---|
| OptiPub Offer | Landing pages, order flow and upsells hosted on OptiPub; you build them in the campaign builder below. |
| Everflow Offer | Clicks go to a partner's Everflow Affiliate offer (see Everflow Offers). |
| External URL | Clicks redirect to any URL you enter. The URL may contain {$campaign_id}, {$effort_id} and {$effort_visit_id} (unique per click), which are filled in on every redirect so the destination can identify the source. |
- Enter a Name for the campaign.
- Write a Description for internal reference.
- Choose the campaign Partner. You can override this later when generating individual links. Everflow campaigns take their partner from the offer.
The offer type is fixed once the campaign is created. The destination itself (the Everflow offer or the URL) can be changed later from the campaign's Offer tab; changes apply to new efforts only. An Everflow campaign's partner must stay matched to its offer.
Step 2. Configure campaign data (optional).
Extra data can be added in the Data box. It can be referenced from message content and should be in JSON format:
{
  "report_link": "OptiPub",
  "report_url": "https://www.optipub.com"
}
Step 3. Build the campaign.
Choosing OptiPub Offer reveals the campaign builder and opens the Primary Offer dialog straight away. Closing it without picking any page unselects the offer type again, so a campaign always has a configured primary offer before it can be saved. Later, hover over the Primary Offer cell and click the blue edit button (or double-click) to change it. Editing the Advert, Promo or Order Page cells opens the same Primary Offer dialog, since the whole chain is configured in one place.
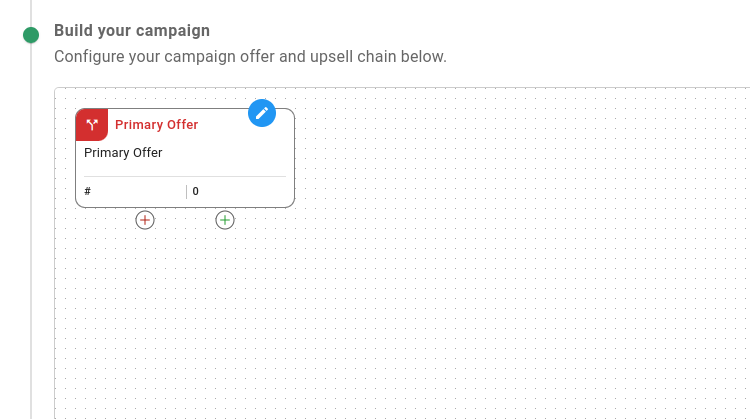
The campaign builder
Step 4. Edit the primary offer.
The primary offer is the path a visitor follows after clicking a campaign link. It starts as a single Order Page; add steps in front of it as needed:
| Path | Behavior |
|---|---|
| Order Page | Visitors go directly to the order page. |
| + Add promo → Promo → Order Page | Visitors see a Promo before the order page. |
| + Add advert → Advert → Promo → Order Page | Visitors see an advert (a lift letter) first, then the promo, then the order page. |
Each card has a single ×: on a promo or advert it removes that step; on the order page (or a promo that sits behind an advert) it clears the choice so you can pick a different page. Click a thumbnail to open the full preview. Everflow Offer and External URL campaigns have no builder, since visitors leave OptiPub on the first click.
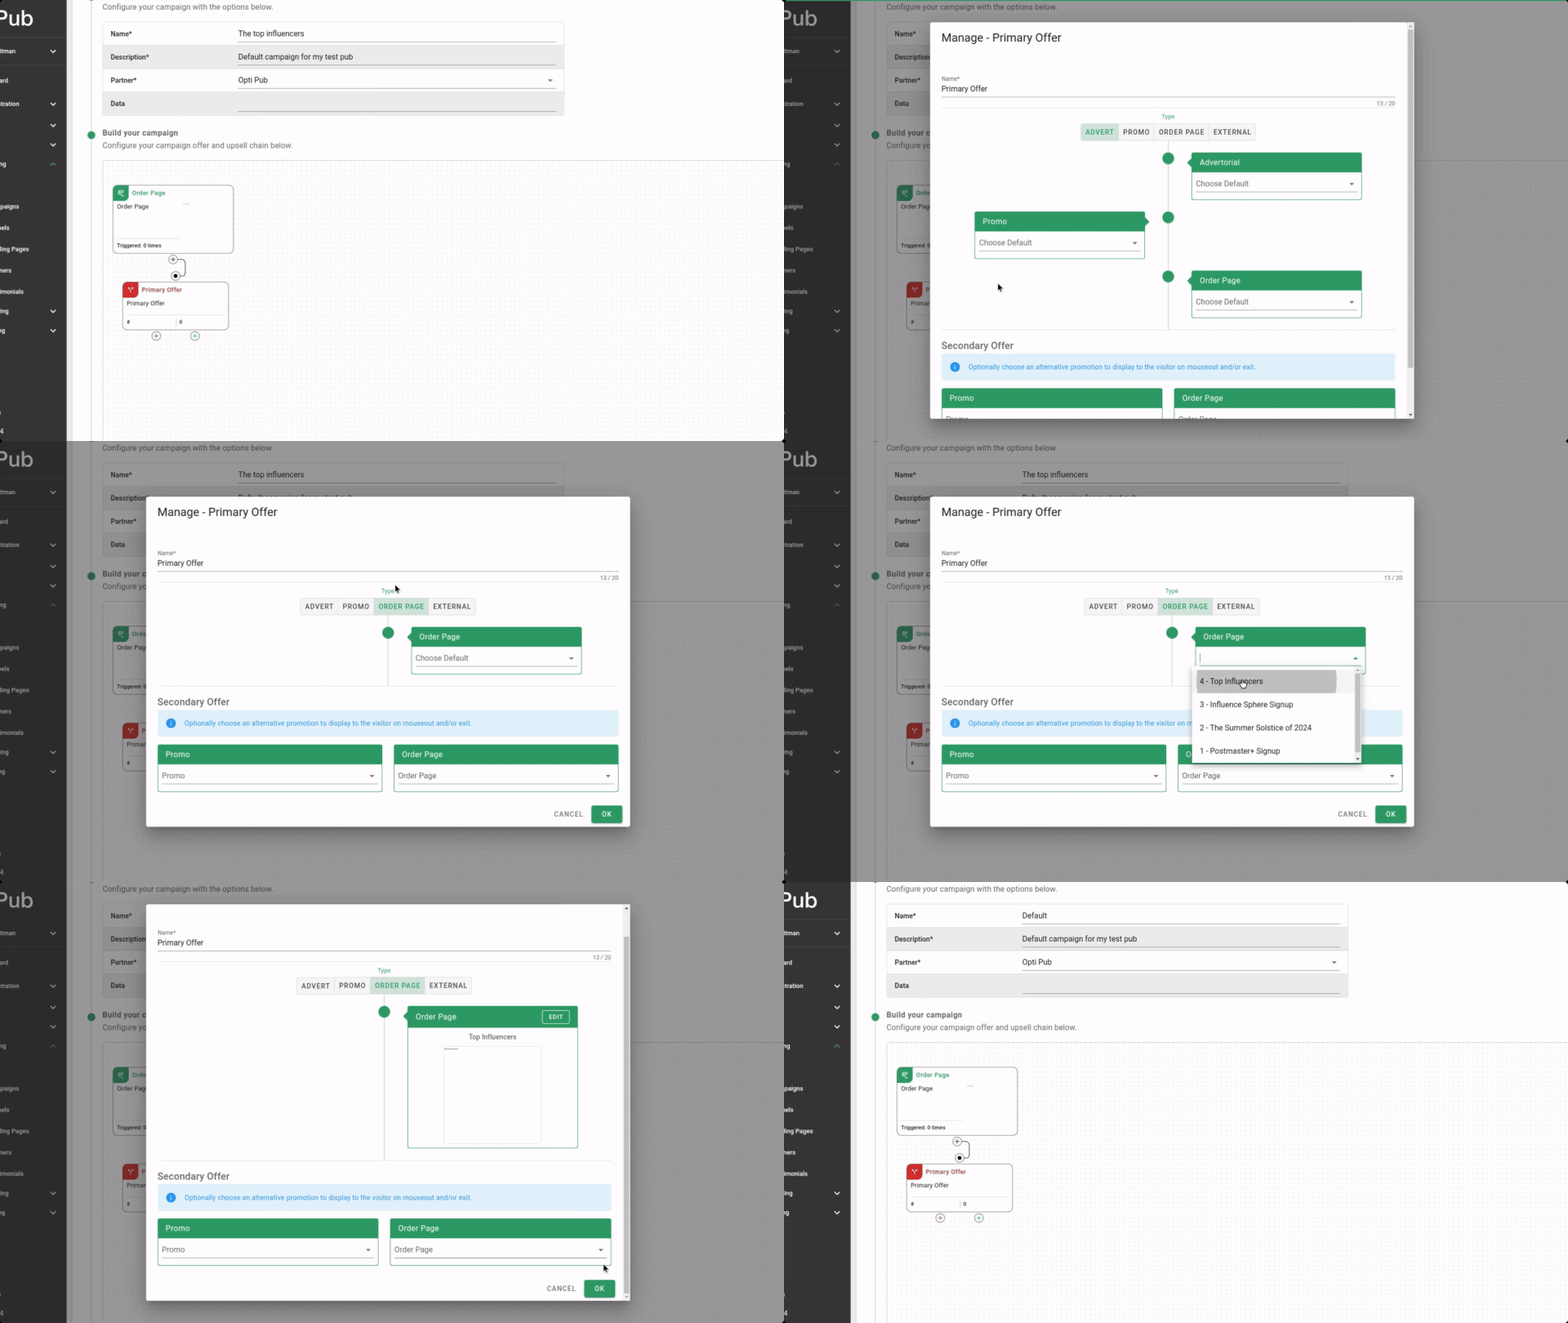
Primary Offer options
Below the primary path, + Add secondary offer adds an alternative Promo → Order Page pair. Visitors reach it through exit intent — an Exit Splash block (promo pages) or Mouse Out block (promo and order pages) placed on the page — or, on a landing page with Redirect on Mobile enabled, straight away on mobile. Both pages are required once the secondary offer is added; click Remove to drop it again.
The Offer name at the top of the dialog becomes the campaign's Offer Name and is used as the effort name whenever a message promotes the campaign, so a specific name (rather than the default Primary Offer) makes effort reports easier to read.
The dialog's OK button stays disabled until every card in the path has a page chosen. Cancelling, pressing Escape or clicking outside the dialog after making changes asks for confirmation before discarding them.
Everflow Offers
When a partner has an Everflow affiliate API key configured, Everflow Offer appears as a campaign offer type.
To create an Everflow campaign:
- Pick the Publication, then the Everflow Offer card. The offer browser opens straight away; closing it without choosing an offer unselects the card again.
- The tiles across the top group the catalogue by headline payout (Under $100, $100 – $150, … $500+, with a Revshare / other tile when an offer pays a percentage rather than a fixed amount). Each shows how many offers fall in the tier, how many you can run, the average payout, the payout types it contains (CPA, CPL, …) and the tier's share of the catalogue. Tick one or more tiles to narrow the list to those tiers; tick again to remove one. The tiles follow the partner, status and search filters, so the counts always describe the list beneath them. The Status filter starts on Runnable: offers marked Public (open to every affiliate on the network, no approval needed) or Approved, which show a Select button. Switch to Needs approval for offers that still Require approval or are Pending approval (these show a Request button), All active for both, or Archived for offers you have put away. The list is sorted newest first.
Use the archive icon on a row to hide an offer you will never run; it disappears from the list and the tiles until you Unarchive it from the Archived view. Archiving is local to OptiPub (Everflow is not told) and never affects campaigns already using the offer. The chosen offer then appears as a card showing its thumbnail, partner, approval status, payout, description, creative count and, when the network provides one, a link to the offer's landing page. Change offer reopens the browser later. - The campaign's Name, Description and Partner are filled in from the offer; edit the name and description as you like. The partner must stay matched, since Everflow offer IDs are only unique within one partner's network.
- Under Importable creatives, tick the creatives you want to bring into OptiPub, then Save the campaign.
On save, OptiPub:
- Requests a tracking link from the partner's Everflow network and stores it as the campaign's external URL, appending
sub10={$effort_id}&sub9={$effort_visit_id}. Every click through a campaign link reports the OptiPub effort ID to Everflow assub10and the individual visit assub9, which is how a conversion finds its way back to the effort and, when the click came from a mailing, the subscriber.sub1–sub8stay free for the network's requirements and your own use. - Imports each selected creative as a Lift Letter on the campaign's publication and creates one promo effort per creative, so each creative gets its own trackable link. Everflow tracking links inside the creative are replaced with
{$sys_division.links.external}; any query parameters they carried (such ascreative_id) are kept on that effort's link so the partner's reports stay per-creative.
The save fails with Everflow's error message if the network refuses to issue a tracking link (for example, when approval was revoked since the last sync).
Importing creatives later
Open the campaign and switch to its Offer tab. Every importable creative has an Import button (and Import all covers the rest in one go). Creatives that are already Lift Letters show an Imported chip linking to the resource. Partners often add creatives after a campaign is live, and the hourly sync picks them up, so this is where new lifts land.
Which creatives import
| Everflow creative | Imported as |
|---|---|
email | The creative's HTML, subject line and from line become the Lift Letter. |
link pointing at a Google Doc | The document is downloaded and cleaned the same way Resources > Create > Import from Google Docs does. The doc must be shared with Anyone with the link; otherwise the import fails with a message saying so. Most doc lifts say "click here" without an actual link, so add {$sys_division.links.external} after import. |
html, image, other links | Listed under Other creatives for reference and preview only. |
Imported content is rewritten so it works as OptiPub content:
| In the Everflow creative | Becomes |
|---|---|
{tracking_link} and links to the network's tracking domain | {$sys_division.links.external} |
{unsubscribe_link} and similar opt-out macros | {$sys_email_unsubscribe} |
| Subject line | The Lift Letter's subject line |
| Images | Left on Everflow's CDN |
Each import reports the creative as imported, reused (already imported earlier), skipped (not an importable type) or failed, along with warnings such as unrecognized Everflow macros still present or no tracking link found. Review those Lift Letters under Contents > Resources before mailing them.
The Lift Letter itself keeps {$sys_division.links.external} as its link, just like any other lift. It resolves when you build a message: create a promo message, choose the campaign, then pick the imported Lift Letter as its content. The link becomes that message's /o/ext/{effort} redirect, which forwards to the Everflow tracking URL with sub10 set to the effort, sub9 set to the visit, and the creative's own parameters (such as creative_id) intact.
Only public offers and offers you are approved for can be selected, and only offers paying out in USD are synced (effort revenue is kept in a single currency).
Conversions from Everflow
When someone converts on the partner's offer, their network fires the postbacks set up on the partner (see Partners > Conversion Postbacks). OptiPub books each one as an Order and Transaction on the Everflow processor, the same records a ThriveCart or SamCart sale produces, so affiliate payouts show up wherever orders do.
| Everflow sends | OptiPub records |
|---|---|
| A conversion | Transaction type N for the payout amount, on an order keyed by the Everflow click. The effort's Conversions and Revenue go up, and the subscriber's timeline gets a Converted entry when the click came from a mailing |
| A post-conversion event (upsell, deposit, …) | Transaction type R on the same order; Revenue goes up, Conversions does not |
Attribution uses sub9 (the visit) first and falls back to sub10 (the effort). A postback that matches neither, or matches an effort on a different partner, is not booked; it appears in the partner's postback Logs with the reason and can be retried. Repeated postbacks for the same conversion are recorded in the logs but never booked twice.
Postbacks are the only source: OptiPub does not poll the network's conversion report. Networks that hold conversions for review fire the postback when the hold ends and the conversion is approved, so a held sale appears in OptiPub at approval time. Conversions the network later rejects or refunds are not reversed in OptiPub; Revenue on the effort is gross of refunds, as it is for every other processor.
Everflow transactions appear on the campaign's Transactions tab, on the Billing > Transactions page (filter the processor to Everflow), and on the subscriber's transactions when the click was attributed. Opening one shows the Everflow detail: conversion and click IDs, event name, payout with currency, sale amount when the network shares it, and the sub9/sub10 values received. Payouts are in USD, the only currency synced offers pay out in.
Step 5. Build the upsell chain (optional).
Click the green + button under the primary offer to add the first upsell. Each upsell requires a name and an order page, and has two outputs of its own: the green + adds the next upsell for customers who accept, the red + adds a decline upsell for customers who pass. You can chain multiple upsells together. The builder lays the chain out for you and cells cannot be dragged: each accepted upsell is placed to the right of the one before it, and a decline upsell sits directly beneath the upsell it branches from, on the first free row below that upsell's own chain. Every link stays a straight line however deep the tree gets.
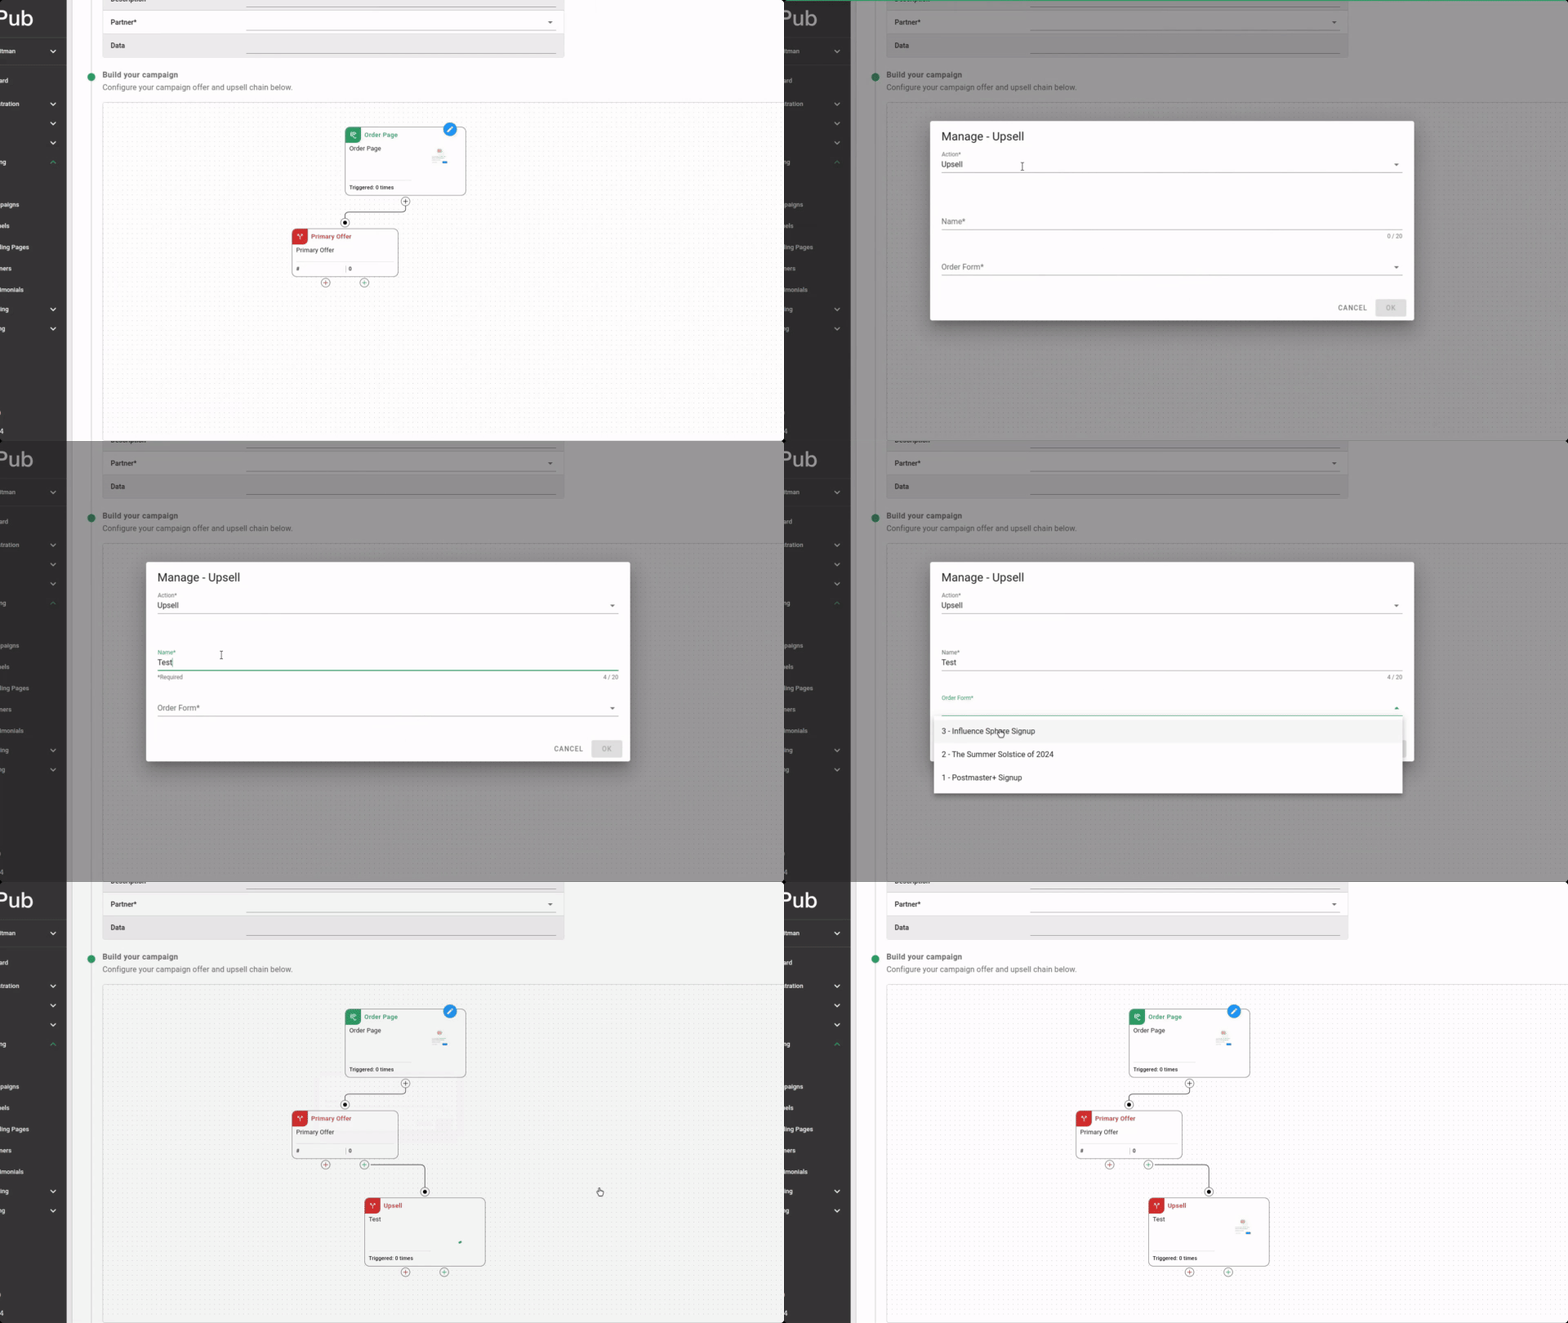
Adding an upsell
Step 6. Save the campaign.
Click Save to finalize, or Save & Close to return to the Campaigns list.
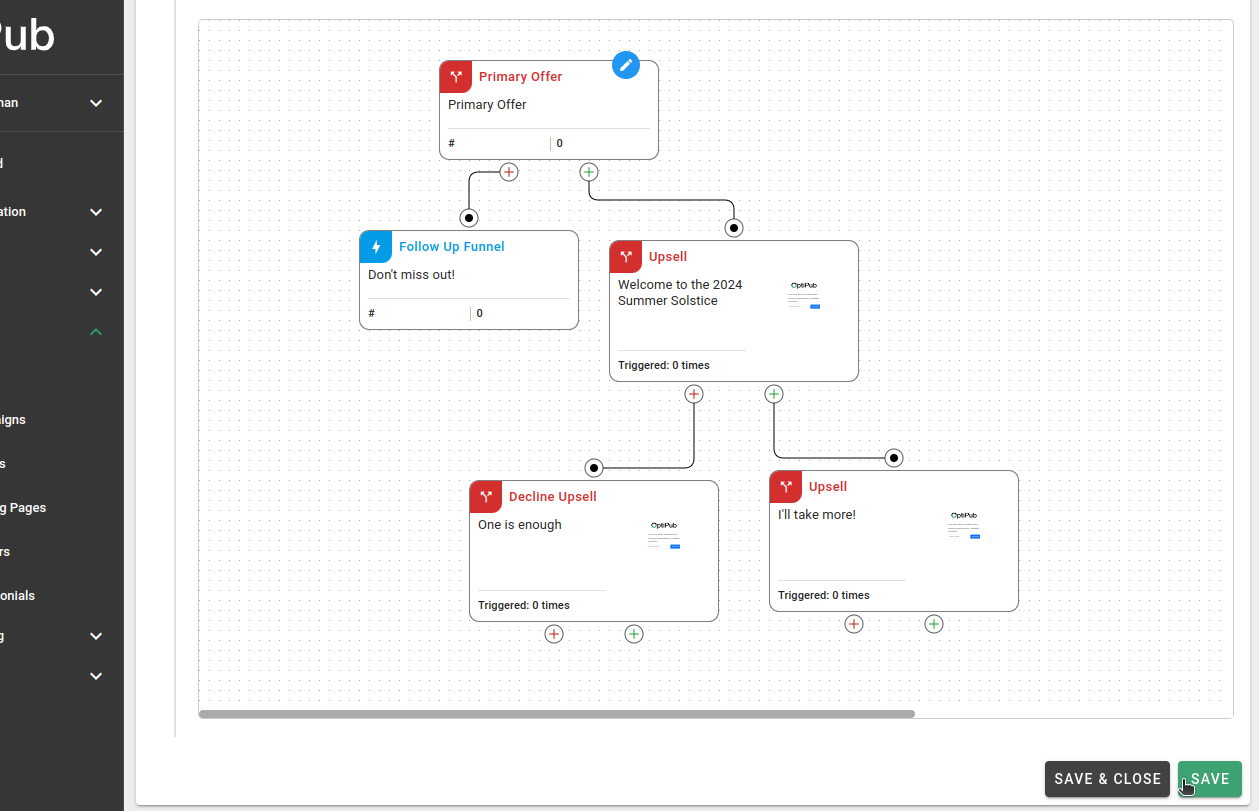
Saving the campaign
Reviewing and changing the funnel later
Opening a campaign lands on its Offer tab (the tab carries the OptiPub, Everflow or link icon for the offer type). For OptiPub offers it shows the campaign builder in read-only mode, with visit counts on the page cells and a #n badge on the primary offer and every upsell and decline upsell showing how many offers a subscriber has received on reaching it. The primary offer is #1, the accepted and declined branches off the same cell share a number, and the highest badge is the most offers any subscriber can be shown. Hover over the builder and click Edit Funnel to make changes, then Save or Cancel. For Everflow and External URL offers the tab shows the destination instead; Edit destination lets you pick a different Everflow offer (and creatives to import) or change the URL. Changes apply to new efforts only.
Generate a Campaign Link
A campaign link is a trackable URL that points to your campaign. Each link creates an effort with its own engagement and revenue statistics.
- Navigate to Marketing > Campaigns and click the campaign's ID to open it.
- Click the Generate Link button in the top right corner.
- Enter an internal name and choose the link type. Optionally, override any of the campaign's default settings (e.g., partner).
- Click OK and copy the generated link.
Generated links are listed at the bottom of the campaign page under Campaign Efforts.
Campaign and effort metadata
Both the campaign and each of its efforts carry their own independent set of key/value Metadata. Campaign metadata is edited from the Metadata card on the campaign page and applies to every link generated from the campaign; effort metadata is edited per effort from the Campaign Efforts table and is not copied from the campaign.
Landing pages can read either set with the {$campaign.meta_data.key} and {$effort.meta_data.key} macros, where key is the metadata key. See Landing Pages.
Links in multiple languages
When translations are enabled, the dialog includes a Languages field. A language is offered only when every page in the funnel — promo, order page, exit intent, advertorial, lift letter, and upsells — exists in it; languages with missing pages are listed as Not translated and cannot be selected. Every fully available language is preselected.
One effort chain is generated per selected language, each pointing at that language's pages, and the dialog lists one link per language. When more than one language is generated, each effort's name ends in its language code, such as Spring Promo [es].
Terms
| Term | Definition |
|---|---|
| Primary offer | The initial action of the campaign builder — the first thing visitors see. |
| Secondary offer | An alternative promo and order page reached through exit-intent blocks or the Redirect on Mobile page setting. |
| Upsell | An additional offer shown after the customer accepts the primary offer. |
| Decline upsell | An alternative offer shown when the customer accepts the primary offer but declines the upsell. |
| Campaign link | A unique trackable URL referencing a single instance (effort) of a campaign. |
Related
Updated 26 days ago